

When I got to college, I tried to stay organized with just my phone, but I found that it was quite challenging. There was too much information to look at on a tiny screen. So, I turned to whiteboards, and I found some practical ways to use them to stay organized. Here are the four methods I use:
- Create columns with time frames for your tasks
- Turn your whiteboard into a monthly calendar
- Turn your whiteboard into a daily schedule
- Track the progress of your tasks using sticky notes
I’ll explain in more detail how to use each of these methods. Keep on reading to follow along!
Choosing a whiteboard
Before you get started with anything, it’s important to decide on a whiteboard to use. If you want to use a whiteboard to organize a few tasks, a simple 23 inch x 17 inch board (link to Amazon) should be just fine.
If you plan on using a whiteboard to stay organized for a long period of time, I recommend investing in a semi-large board that’s around 3 feet x 2 feet (link to Amazon).
Lastly, if you plan on using a whiteboard with multiple people, I recommend investing in a large whiteboard that’s around 6 feet x 4 feet (link to Amazon). This should be sufficient if you’re working with four or five other people. If you have more than six people working on a whiteboard, you may want to get an even larger board. Here’s an 8 feet x 4 feet whiteboard at Amazon (link to Amazon).
1. Create columns with time frames for your tasks

The first method to use a whiteboard to stay organized is creating columns with time frames for your tasks. Who should use this method?
- Those who simply want to use a whiteboard to remind them of when tasks are due. If you’re looking to write a lot of information down, this method isn’t for you.
If you decide to use this method, you can either use markers or sticky notes to organize your whiteboard. I recommend using stick notes because it’s easy to move things around. Here’s how to use this whiteboard organization method:
1. Create columns with specific time frames
Writing across the top of your whiteboard, write down different time frames that fit your lifestyle. For example:
- Daily (tasks you have to complete every day)
- To-Do (tasks due between 1 and 7 days)
- Soon (tasks due between 8 and 31 days)
- Later (tasks due after 31 days)
Those were just examples. You can create any time frames you’d like. You could even replace the column titles with the actual time frames (e.g. using 1-7 Days as a column title instead of To-Do). Also, use a different colored marker for each time frame. Over time, you’ll remember which color corresponds to its time frame.
2. Write down all your tasks/priorities under the correct time frame
Very straight forward; all you need to do now is write down all your tasks under the time frames you created in step one. It’s up to you to decide whether you want to write down all your tasks or just the important ones.
For example, if you’ve been working out or exercising every day for the past few years, you might not want to write it down in your whiteboard because you’re already used to completing this task every day. On the other end, if you’ve only been working out or exercising for a couple of months, it’s a good idea to write it down in your whiteboard.
Not only will this help you stay organized and on top of your fitness regimen, but it will also be a physical reminder for you to go exercise!
3. Write due dates beside each of your tasks
Now that you have all your tasks written out, write the due date for each task. You don’t need to this for your Daily column as each task’s due date is repeated every day. Writing due dates will physically remind you when a specific task is due, that way you’ll never miss it.
If possible, write all the due dates with a colored marker that you haven’t used. This makes it easy for you to find due dates without having to read every task.
4. As time goes by, move tasks to the correct time frame
If you have a time frame for tasks that are due between 1 and 7 days, you’ll need to move a task that was originally due in 8 days very soon. This can be troublesome to do if you have a lot of tasks written down and you’re organizing your whiteboard using markers.
This is why I recommended you to use sticky notes as it takes less than a second to move tasks around. You need to check your whiteboard daily to stay organized. It’s best to try to keep your whiteboard empty. Whenever you have free time, tackle your tasks that are due far from now so you can empty up your whiteboard.
2. Turn your whiteboard into a monthly calendar
The second method to use a whiteboard to stay organized is turning your whiteboard into a monthly calendar. Who should use this method?
- Those who already own a whiteboard
- Those who already use an electronic calendar to stay organized
The reason I said this method is for those who already own a whiteboard is to not let your board go to waste. It could be a waste because you can buy a wall calendar (link to Amazon) instead of using this method.
So, if you currently own a whiteboard but want to turn it into a monthly calendar to stay organized, follow these steps or watch the video below:
Note
I am not recreating the bottom part of the video guide. Personally, I don’t feel like it’s necessary, but you can replicate it if you’d like.
1. Grab the necessary tools
To get started, grab the following tools to construct your whiteboard-calendar.
- Ruler
- Scissors
- Tape measure
- Permanent marker
- Scotch vinyl electrical tape (link to Amazon)
If you don’t have the scotch tape, use another tape that is opaque and small in width. If you only have thicker tape lying around, you’ll need to cut the strips smaller later on.
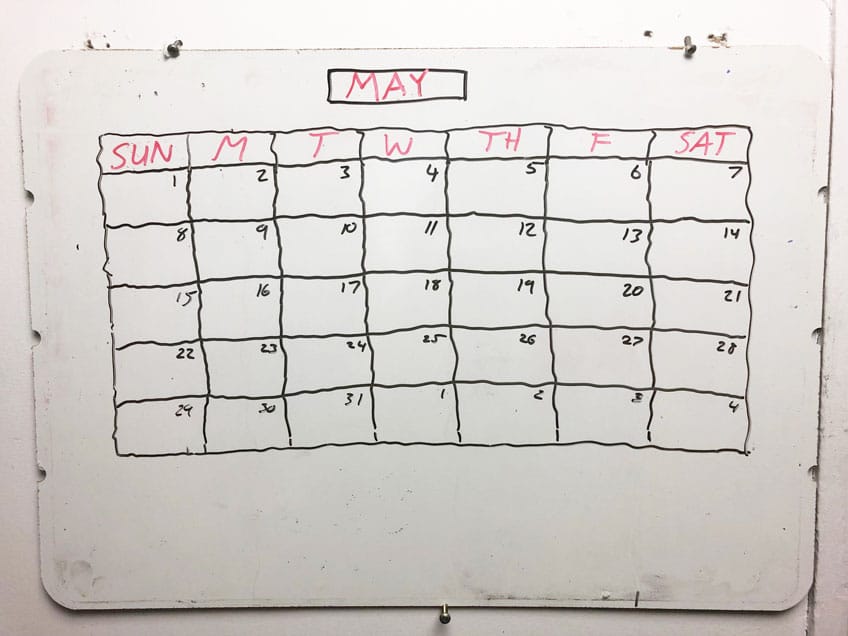
2. Sketch out a calendar on your whiteboard
Use your permanent marker to sketch out a calendar on your whiteboard. Make sure your boxes are as even as possible. Use your measuring tape and ruler to create accurate guidelines.
Make sure to include the days of the week and sketch a small box at the top of your whiteboard to indicate which month it is. Leave some empty space at the bottom of your whiteboard for extra notes.
3. Go over your calendar sketch with tape
Carefully use your tape to go over every line of your calendar sketch, but make sure you erase the line before applying the tape. If your tape is too thick, use your scissors to make the strips smaller. Then, use your ruler to keep the tape straight when you go to apply it.
4. Fill in your calendar
At this point, you should have:
- A box at the top of your whiteboard to indicate the month of your calendar.
- An outline of a calendar using tape that includes the days of the week
- Empty space at the bottom of your whiteboard to write down notes
Now, fill in your calendar. Write down the current month, the days of the week, the numbers of the month, and tasks that are due this month.
You can use the white space at the bottom for whatever you want. I recommend using the empty space to write down additional information for your tasks if needed. For example, if you have a test at school on the 8th, at the bottom of your whiteboard, write down the chapters you have to study.
3. Turn your whiteboard into a daily schedule
The third method to use a whiteboard to stay organized is turning your whiteboard into a daily schedule. Who should use this method?
- Those who want to follow a daily routine
- Those who want to use a whiteboard to increase their daily productivity
- Those who use other tools to organize their to-do list
Having a daily schedule is important because you can maximize your daily productivity (assuming you follow it). This method focuses on organizing your daily activities so that you’re not wasting time throughout the day.
You’ll have to use another method or tool to keep track of your to-do list/tasks. The following steps are very similar to the ones in method two of this guide. If you read method two, you’ll already know how to use this method. If you didn’t read method two, follow these steps to turn your whiteboard into a daily schedule:
1. Grab the necessary tools
Grab the following tools to construct your daily schedule:
- Ruler
- Scissors
- Tape measure
- Permanent marker
- Scotch vinyl electrical tape (link to Amazon)
If you don’t have scotch tape lying around, find another one that is opaque and relatively small in width. If you only have thick tape lying around, you’ll need to cut the strips smaller later on.
2. Sketch out an empty daily schedule
Use your permanent marker to sketch out an empty daily schedule on your whiteboard. You can replicate the daily schedule in the image above, or come up with your own.
Make sure your boxes are as even as possible by using your measuring tape and ruler to create accurate guidelines. Also, make sure you include the days of the week.
3. Go over your daily schedule sketch with tape
Carefully use your tape to go over every line of your daily schedule sketch, but make sure you erase the line before applying the tape. I know this can be time-consuming, but don’t worry; you only have to do it once.
If your tape is too thick, use your scissors to cut the strips smaller. Then, use your ruler to keep the tape straight when you go to apply it.
4. Fill in your daily schedule
To fill in your daily schedule, read my How to stop being lazy in college guide. In the guide, I teach you everything you need to and think of when filling in a daily schedule. Here’s a basic version of the guide:
- Fill in your mandatory schedule. Write down everything you have to do every day of the week. This includes the time to get ready and drive to school or work, your school or work schedule, sleep schedule, and other recurring tasks like taking out the garbage, going to church, and picking up a sibling.
- Fill in time to be productive. Allocate some time for yourself to be productive every day. This includes working on side projects, completing homework, running errands, and so on. Depending on your schedule, you could have a lot of productivity time, or very little.
- Allocate your free time. Give yourself free time after your productivity time for each day. You’re free to do whatever you’d like during your free time.
4. Track the progress of your tasks using sticky notes
The fourth method to use a whiteboard to stay organized is tracking the progress of your tasks using sticky notes. Who should use this method?
- Those who want to organize specific stages of their tasks
- Those who want to use their whiteboard as a project management tool
This method is very similar to Trello. Trello is a project management tool that allows you to manage multiple tasks and track how they’re progressing. Luckily, this method is very easy to set up. All you need are markers and sticky notes. Follow these steps to set up your whiteboard:
1. Create progressive titles suitable for your tasks
Progressive titles are titles that indicate the status of a task. You can label these titles however you’d like. For example:
- Potential new task
- Task review
- Approved task
- In progress
- On hold
- Awaiting review
- Final edits
- Completed task
The number of progressive titles is entirely up to you. If your tasks are simple, you may only need four progressive titles. If your tasks are complex and require the attention of other people, you may require 10 progressive titles. Once you have all your titles laid out, move on to the next step.
2. Create columns for your progressive titles
Turn your whiteboard to a landscape (horizontal) position. Count the number of progressive titles you have and then use a ruler to divide your columns on the whiteboard evenly.
Keep in mind that you’re going to be using sticky notes to track your tasks, so make sure the columns are wide enough to fit them.
3. Write all your tasks on sticky notes and coordinate them by colors
Grab different colored sticky notes to write all your tasks down. The reason we’re using different colored sticky notes is to organize tasks that are in different areas (e.g. housework, YouTube, and a blog).
For example, all your red sticky notes will track your YouTube tasks, all your green sticky notes will track your housework, and all your yellow sticky notes will track your blog work.
4. Move your tasks to the correct progressive title
Now that you have all your tasks written out, place them under the correct progressive title. If you want, you can even write down completed tasks and place them under your last progressive title. Doing this will remind you of the tasks you’ve already completed.
Whenever you work on your tasks, make sure to move them to the correct column immediately. This will help you stay organized and accurately track how they’re progressing.
Conclusion
Each method in this guide is a great way to use your whiteboard to stay organized. Having a physical organization tool like a whiteboard can be more effective than electronic organization tools.
If you find yourself struggling to organize yourself, re-read each of these methods and determine which organizational method is best for you.
What did you think about this blog? Comment below! Also, subscribe to my newsletter for updates on new content, including videos on YouTube!